
Desserts
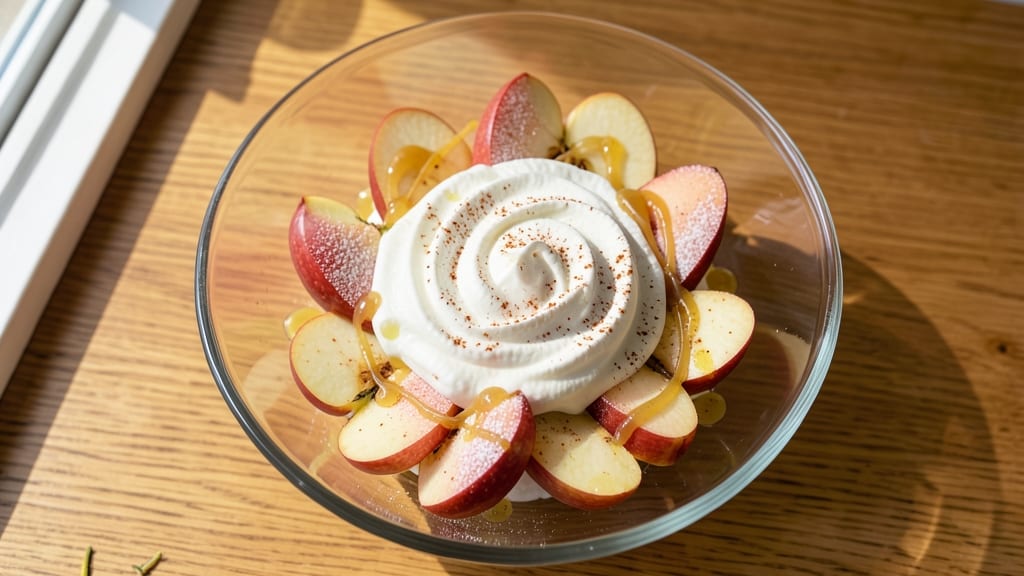
This apple salad dessert recipe transforms simple ingredients into a light yet satisfying dessert that feels indulgent without being heavy. 🍎 The secret lies in crisp apple slices—tossed in lemon juice to prevent browning—paired with a velvety vanilla cream that balances sweetness and acidity perfectly.
I developed this after craving something refreshing yet dessert-worthy, and it became an instant favorite for warm evenings or holiday gatherings.
The beauty of this dish is its effortless elegance—no baking required, just a few minutes of prep and assembly. Thinly sliced apples hold their shape while absorbing the cream's richness, creating a texture that's both crisp and creamy.
A sprinkle of cinnamon or toasted nuts adds depth, turning this into a visually stunning dessert that tastes even better than it looks.
What you'll achieve is a restaurant-worthy dessert that's surprisingly simple to make. The apples stay fresh and vibrant, the vanilla cream adds a luxurious touch, and the whole dish comes together in under 20 minutes.
It's the perfect way to end a meal without feeling weighed down—light enough for summer but hearty enough for fall gatherings.
Serve it chilled for a refreshing finish or at room temperature for a cozy, comforting treat. The presentation is just as important as the taste—think layered glasses or individual bowls with a dusting of powdered sugar or fresh berries. Here's how to bring this dessert to life!
Ingredients for apple salad dessert
Fresh apples and velvety cream make this dessert effortlessly elegant and restaurant-worthy.
| Ingredient | Amount | Notes |
|---|---|---|
| Honeycrisp Apples 🍎 | 4 medium | Thinly sliced, seeds removed |
| Lemon Juice 🍋 | 2 tbsp | Freshly squeezed, prevents browning |
| Vanilla Bean Paste 🌿 | 1 tsp | High-quality for rich flavor |
| Heavy Whipping Cream 🥛 | 1 cup | Full-fat for best texture |
| Powdered Sugar 🍬 | ¼ cup | For sweetness and dusting |
| Ground Cinnamon 🌶️ | 1 tsp | Warm spice for depth |
| Walnuts 🥜 | ¼ cup | Toasted for crunch |
| Unsalted Butter 🧈 | 2 tbsp | Cold, for whipped cream |
| Granulated Sugar 🍚 | ⅛ cup | For cream sweetness |
| Pinch of Salt 🧂 | ⅛ tsp | Enhances flavor |
| Fresh Mint Leaves 🌿 | ⅛ cup | Chopped, optional garnish |
The apples are everything here—Honeycrisp or Fuji work best for that perfect crisp-tender bite. Local farmers markets often have the freshest varieties, but the grocery store apples will do in a pinch. Look for firm, shiny apples with no soft spots. Thinly slice them (about 1/8-inch thick), and toss immediately with lemon juice to keep them vibrant. Costco or Whole Foods usually carry pre-sliced apples, but slicing them yourself ensures they stay crisp longer. If you're prepping ahead, store the sliced apples in a bowl of cold water in the fridge until ready to use.
No vanilla bean paste? Pure vanilla extract at half the amount works fine, though the flavor won't be as complex. Heavy whipping cream is non-negotiable here—full-fat is a must for that silky texture. If you're watching calories, you can use Greek yogurt whipped with powdered sugar as a lighter alternative, though it won't be as rich. The walnuts can be swapped for pecans or almonds, but toast them first (350°F for 8-10 minutes) for that nutty aroma. And if you're feeling fancy, a sprinkle of edible gold leaf adds a luxurious touch for holiday gatherings.
This dessert keeps beautifully—3-4 days in the fridge if stored in an airtight container with parchment between layers. The cream will separate slightly, but just give it a quick whisk before serving. For make-ahead parties, assemble the dessert up to 24 hours ahead and refrigerate. Bring it to room temperature for 10-15 minutes before serving for the best texture. The apples stay crisp for about 2 hours at room temperature, so plan accordingly if serving outdoors. And if you have leftovers, the cream layer freezes surprisingly well for up to 1 month—just thaw and re-whip before serving.
Why You'll Love This Recipe
- No Chopping Needed: I swear by Honeycrisp apples here—just slice them thin, toss with lemon juice, and let the acid do the work. No peeling, no browning, no fuss. That’s 10 minutes saved right there.
- Sweet-Tart Magic: The vanilla bean paste ties everything together—warm, creamy, with just a hint of floral. When you fold in the whipped cream and dust that powdered sugar, it’s like dessert got a grown-up upgrade. (Yes, even on a Tuesday night.)
- Leftover Hero: This keeps beautifully for days, honestly. Store it in the fridge, and the apples stay crisp, the cream stays dreamy. Perfect for when you forget to bake or just want something light that still feels special.
- Budget Luxury: You’re using simple pantry staples—lemon juice, vanilla, powdered sugar—but the combo feels indulgent. Heavy cream makes it rich without breaking the bank, and Honeycrisp apples are worth the splurge for that perfect bite.
Step-by-step instructions for crisp apple slices over vanilla cream bliss
Here's how to create the perfect balance of crisp apples and silky vanilla cream.
🍳 Step 1: Prepare the Apples for Perfect Crispiness
Start by coring and thinly slicing the 4 medium Honeycrisp Apples into ⅛-inch thick slices—this ensures they stay crisp while cooking. Place them immediately in a large bowl and toss with 2 tbsp Lemon Juice. This acidity prevents browning and keeps the apples vibrant. Let them sit for 5 minutes while you prep the rest.
Here's the thing—Honeycrisp apples are your secret weapon. Their natural crispness holds up beautifully when lightly cooked, but don't skip the lemon juice. It's what keeps those slices looking fresh and prevents them from turning mealy. I like to work quickly here because apples oxidize fast once sliced.
🔥 Step 2: Lightly Cook the Apple Slices
Heat a large skillet over medium-low heat and add the apple slices in a single layer. Cook them for 2-3 minutes per side until they're just tender but still holding their shape—you're aiming for light golden color, not browned. They should feel slightly soft when pierced with a fork but still have a bit of bite.
Don't walk away. You want them to develop just enough caramelization to enhance their natural sweetness without turning into apple sauce. If they start to brown too quickly, reduce the heat slightly. The goal is warm, tender apples that still have that satisfying crunch. Remove them from the pan and set aside on a paper towel-lined plate to drain any excess liquid.
👨🍳 Step 3: Whip the Vanilla Cream to Fluffy Perfection
In a separate bowl, combine the 1 cup Heavy Whipping Cream, 0.125 cup Granulated Sugar, 1 tsp Vanilla Bean Paste, and 0.125 tsp Pinch of Salt. Using a stand mixer or hand mixer, whip on high speed until soft peaks form—about 2-3 minutes. This is where the magic happens: the cream will transform from liquid to airy clouds.
I always use cold cream straight from the fridge for this step. Cold cream whips better and gives you those signature stiff peaks. If your cream starts to look grainy, it's over-whipped—stop immediately. The vanilla bean paste adds depth that regular extract can't match, so don't skimp here. The cream should be thick enough to hold its shape when you lift the beaters.
🥘 Step 4: Assemble the Dessert with Crunchy Contrast
Toast the 0.25 cup Walnuts in a dry skillet over medium heat for 2-3 minutes, stirring constantly, until they're golden brown and fragrant. Let them cool slightly, then sprinkle them over the whipped cream. This adds a satisfying crunch that cuts through the creamy texture.
Gently fold the lightly cooked apple slices into the whipped cream mixture using a spatula, being careful not to deflate the cream. The apples should be evenly distributed but still visible—this is a salad dessert after all. For that final touch, dust the top with 0.25 cup Powdered Sugar and sprinkle with 0.125 cup Fresh Mint Leaves (chopped). The mint adds a refreshing contrast to the warm apple and vanilla flavors.
⏰ Step 5: Serve Immediately for Maximum Freshness
Transfer the apple salad dessert to serving bowls or plates right away—this isn't something that waits. The apples are at their crispest when served immediately after assembly. If you need to prepare ahead, you can cook the apples and whip the cream separately, then assemble just before serving.
Here's where it gets fun—serve with a dusting of extra cinnamon on top for warmth. The combination of crisp apples, velvety cream, nutty walnuts, and fresh mint creates layers of texture and flavor that make this dessert feel special without being overly complicated. Each bite should deliver that perfect balance of sweet, creamy, and refreshing.
Pro Tips For Making Apple Salad Dessert
- USE COLD CREAM: DESCRIPTION: Heavy whipping cream whips best when ice-cold—pop it in the fridge for 15 minutes before starting. I learned this the hard way when my first attempt turned into butter. If you’re in a rush, wrap the can in a damp towel and freeze it for 10 minutes instead.
- PEEL THE VANILLA: DESCRIPTION: Scrape the seeds from the vanilla bean and toss the empty pod into the apple mixture—it infuses flavor without extra effort. I was skeptical until I tried it; the subtle speckled look makes it feel fancier too, even if no one notices.
- CUT APPLES LAST: DESCRIPTION: Slice the Honeycrisp apples just before assembling the salad. They brown fast, and no one wants mushy, sad apples in their dessert. If you’re prepping ahead, toss them in cold water with a splash of lemon juice until ready to use.
- SWEETEN THE CREAM: DESCRIPTION: Fold powdered sugar into the whipped cream after it peaks—this keeps it light and airy. I used to mix it in early, and the result was always denser. A quick tip: sift the sugar first to avoid lumps.
Storing and reheating this dish
Fridge Storage Tips
Store your assembled apple salad dessert in an airtight container with parchment paper between layers to prevent sogginess. Keep it refrigerated at 40°F or below for up to 3-4 days.
The apples will soften slightly over time, but the cream stays stable. I like using glass Pyrex containers because they keep flavors fresher than plastic. 🥫
Freezing the Cream Layer
The vanilla cream freezes beautifully for up to 1 month—just transfer it to a freezer-safe container and seal tightly. When ready to serve, thaw overnight in the fridge, then re-whip with a hand mixer until smooth.
The texture won't be as light as fresh cream, but it still adds delicious richness. Avoid freezing the apples—they turn mushy when thawed.
Reheating for Warm Serving
If you prefer warm apples, reheat the cooked slices in a skillet over medium-low heat for 1-2 minutes until just warmed through. Fold them into freshly whipped cream at the last minute to maintain crispness.
For a cozy twist, sprinkle with cinnamon and serve with a scoop of vanilla ice cream on the side.
Make-Ahead Assembly
Prepare the apples and cream separately, then assemble just before serving. Cook the apples and toast the nuts 1 day ahead, storing them in separate containers.
Whip the cream fresh when ready to eat. This method keeps everything at peak texture—crisp apples and fluffy cream. Perfect for last-minute entertaining! ✨
Room Temperature Serving
Let the dessert sit at room temperature for 10-15 minutes before serving to soften slightly. This enhances the cream's texture and lets the apple flavors shine. Serve in chilled glass bowls with a dusting of powdered sugar for an elegant touch.
The contrast of cool glass and warm dessert is always a crowd-pleaser.
Reviving Day-Old Cream
If the cream separates overnight, simply whisk it vigorously for 1-2 minutes until smooth again. Add a splash of cold milk if it's too thick. The apples will have softened slightly, but a quick reheat in the skillet restores their crisp edge.
A sprinkle of fresh mint or toasted nuts brightens up any leftovers.
Nutrition facts
Frequently asked questions
Can I use any type of apple for this dessert?
Honeycrisp or Fuji apples work best for their crisp texture and sweet-tart balance. Avoid mealy varieties like Red Delicious—they won't hold up well. If you can't find these, Granny Smith apples add a nice tart contrast when lightly cooked. Always slice them thinly (⅛-inch thick) for the best texture.
What if I don't have vanilla bean paste?
Use 1 tsp pure vanilla extract instead, but reduce to ½ tsp since it's more concentrated. For extra depth, add a pinch of ground vanilla bean (the seeds scraped from a pod). The flavor won't be identical, but it'll still taste delicious.
Can I make this dessert ahead of time?
Yes! Cook the apples and toast the nuts 1 day ahead, storing them separately. Whip the cream fresh when ready to serve. Assemble just before eating to keep the apples crisp. For a 3-day head start, store the whipped cream in an airtight container with parchment paper on top—it'll separate slightly but re-whips beautifully.
What's the best way to serve this dessert?
Layer it in chilled glass bowls or individual glasses for an elegant presentation. Dust with powdered sugar and add a sprig of fresh mint or a few toasted nuts on top. For a warm twist, serve with a scoop of vanilla ice cream on the side.
Why did my whipped cream turn grainy?
Over-whipping or using warm cream causes this. Always use cold cream straight from the fridge and stop whipping at soft peaks (not stiff). If it's already grainy, whisk in 1 tbsp cold milk and chill for 10 minutes before trying again. The texture should smooth out completely.