
Salads
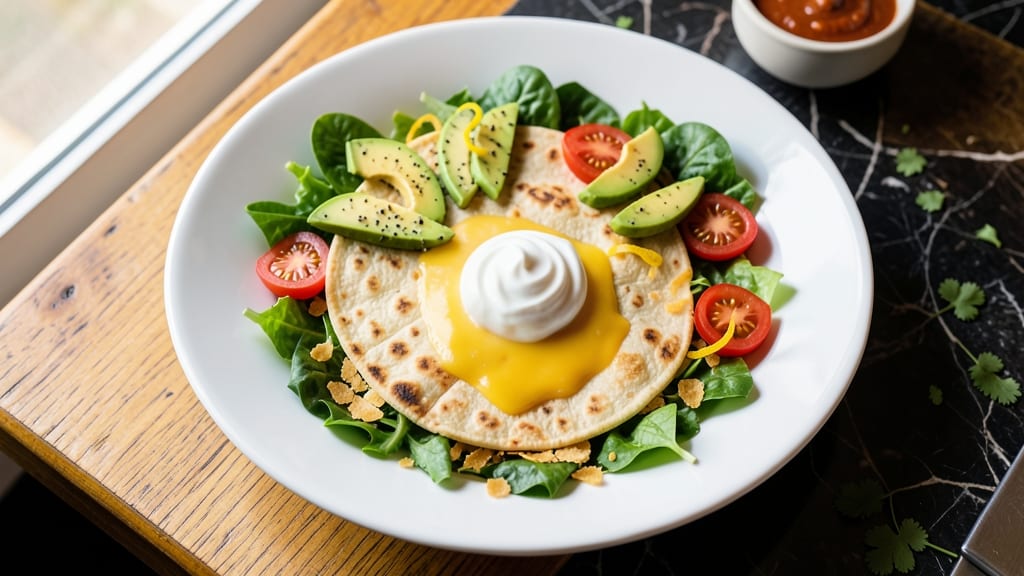
This Applebee's quesadilla salad recipe delivers the same crispy tortilla bites and creamy ranch velout you crave at home—without the restaurant markup. 💛 The secret lies in perfectly melting cheddar between tortillas until golden, then carefully cutting into crispy squares that hold their shape.
I've recreated this dish exactly as it appears on menus, with that satisfying crunch and melty cheese combination that makes it irresistible.
The magic happens in three key steps: baking the tortillas until crisp, layering them with just the right amount of cheese for maximum melt, and assembling over a bed of fresh lettuce, diced tomatoes, and avocado for that signature restaurant presentation.
This isn't your average salad—it's a hearty, satisfying meal with all the textures you love: crispy, creamy, fresh, and cheesy all at once.
What you'll end up with is a dish that looks just like the one from Applebee's, complete with those crispy tortilla triangles piled high over creamy ranch dressing and fresh vegetables. The tortillas stay crispy even after being topped, and the cheese maintains its perfect melt without turning greasy.
It's the kind of recipe that transforms a simple salad into something special enough for dinner guests or a satisfying weeknight meal.
Serve with extra sour cream for dipping or a side of their famous ranch dressing—this version stays true to the original while being easier to make at home.
The plating tips I've included will help you recreate that restaurant-quality presentation perfectly. Let's get started on making this restaurant favorite at home!
Ingredients for applebee's quesadilla salad
Crispy tortillas, melty cheese, and creamy ranch—here's how to recreate Applebee's signature dish at home.
| Ingredient | Amount | Notes |
|---|---|---|
| Flour Tortillas 🌯 | 8 whole | Medium-sized, 10-inch preferred |
| Sharp Cheddar Cheese 🧀 | 1 ½ cups | Shredded, full-fat preferred |
| Romaine Lettuce 🥬 | 1 head | Chopped into bite-sized pieces |
| Ripe Avocados 🥑 | 1 whole | Diced, skin and pit removed |
| Medium Tomatoes 🍅 | 2 whole | Diced, seeds removed |
| Sour Cream 🧈 | ½ cup | Full-fat for best texture |
| Ranch Dressing 🥛 | ¾ cup | Homemade or store-bought |
| Lime Wedges 🍋 | 2 whole | For garnish and brightness |
| Butter 🧈 | 2 tbsp | Melted, unsalted preferred |
| Salt 🧂 | ½ tsp | Diamond Crystal preferred |
| Black Pepper 🌶️ | ¼ tsp | Freshly ground for best flavor |
| Garlic Powder 🧄 | ½ tsp | For extra depth of flavor |
| Olive Oil 🫒 | 1 tbsp | For brushing tortillas |
| Lemon Juice 🍋 | 1 tbsp | Freshly squeezed for brightness |
The tortillas are everything here. Mission brand or La Tortilla Factory are my go-tos—they hold up best to baking and cutting. Look for medium-sized (10-inch) tortillas—they're perfect for cutting into those crispy triangles. The cheese? Sharp cheddar is non-negotiable—it melts perfectly without turning greasy. If you're using pre-shredded, give it a quick pulse in the food processor to break up the anti-caking agents. For the ranch, Hidden Valley or Bolthouse Farms are solid choices, but I always make a quick batch at home with sour cream, mayo, and herbs for extra freshness.
No sharp cheddar? Monterey Jack at half the amount works in a pinch, but it won't have that same tangy bite. Ran out of sour cream? Greek yogurt with a splash of lemon juice mimics the texture beautifully. The avocados should be ripe but firm—Hass variety is perfect. If you can't find fresh limes, bottled lime juice works, but fresh is always better. For the tomatoes, I like to dice them small so they don't overpower the other flavors. And if you're feeling fancy, add a sprinkle of crumbled bacon on top—it's a game-changer that keeps the dish true to the original.
This salad keeps best when assembled just before serving—the tortillas lose crispness fast. Store the baked tortilla squares and cheese separately in the fridge for up to 2 days, then reheat in a 350°F oven for 5 minutes to restore crispness. The ranch and veggies can be prepped ahead and stored in airtight containers for 3 days. For extra crunch, serve with crispy tortilla chips on the side—it's a crowd-pleaser at parties. The lime wedges should be added right before serving to keep them fresh and zesty.
Why You'll Love This Recipe
- No Tortilla Stress: I just fold, flip, and toast—no fancy folding skills needed. The tortillas stay intact (mostly), and that crispy-cheese edge is worth the occasional tear.
- Creamy-Crunchy Magic: Sharp cheddar melts into gooey perfection while the avocado adds buttery richness. Between us, the first bite makes you wonder why you didn’t order this at Applebee’s every week.
- Lunch or Dinner Fix: Same ingredients, endless uses. Serve it cold in the office with a fork, or warm it up for dinner with sour cream and salsa. My college-aged son calls it his "hungover hero" (I don’t judge).
- Budget-Friendly Leftovers: Uses pantry staples you already own, and the salad holds up for days. I’ve packed it for lunches, reheated it for quick dinners, and even turned it into a snack by tossing it in a tortilla again—no waste, all flavor.
Step-by-step instructions for Applebee's-inspired quesadilla salad
Here's how to recreate that signature crispy-tender texture and creamy ranch velout at home.
🔥 Step 1: Create Crispy Tortilla Bites
Preheat your oven to 425°F and line two baking sheets with parchment paper. Cut each of the 8 whole flour tortillas into 8 wedges (like pizza slices) for perfect bite-sized pieces. Brush both sides of all tortilla wedges with the 1 tablespoon olive oil—this creates that signature crispy exterior.
Spread 1.5 cups shredded sharp cheddar cheese evenly over half of each tortilla wedge, leaving a ½-inch border uncheddared. Fold the plain half over the cheddar to create neat little quesadilla triangles. Arrange them on the prepared baking sheets, leaving ½-inch space between each piece.
Bake for 10-12 minutes until the edges are deep golden brown and the cheese is fully melted. Watch closely after 8 minutes—they crisp up quickly. Remove from oven and let cool for 5 minutes before assembling the salad to prevent sogginess.
👨🍳 Step 2: Prepare the Creamy Ranch Velout Base
In a medium bowl, combine the 0.75 cup ranch dressing with the 0.5 cup sour cream and 1 tablespoon lemon juice. Whisk until smooth and creamy. This velout should coat the back of a spoon—if it's too thick, add 1-2 teaspoons water to reach your desired consistency.
Season with 0.5 teaspoon salt, 0.25 teaspoon black pepper, and 0.5 teaspoon garlic powder. Taste and adjust seasoning—you want it bright and tangy, not bland. Here's the thing: the ranch dressing already has salt, so go easy with the additional seasoning unless you're using a low-sodium version.
🥘 Step 3: Assemble the Salad Layers
In a large serving bowl, combine the chopped romaine lettuce, diced ripe avocado, and diced medium tomatoes. Gently toss with 1 tablespoon melted butter to add richness without overpowering the fresh flavors. The butter helps balance the acidity from the tomatoes and avocado while keeping everything moist.
Add the crispy tortilla bites and gently fold them into the lettuce mixture. Pour the ranch velout over the top and toss lightly—just enough to coat everything evenly. The tortilla bites should be partially submerged in the creamy sauce, but not swimming in it. Here's where it gets fun: sprinkle with lime wedges for that signature Applebee's brightness.
🍽️ Step 4: Serve Immediately for Maximum Crispiness
Divide the quesadilla salad among 4 serving plates, ensuring each gets an even distribution of tortilla bites, greens, and creamy sauce. Garnish with additional lime wedges and a final sprinkle of black pepper for visual appeal and flavor.
Serve immediately while the tortilla bites are still crispy. The salad holds up well for 15 minutes at room temperature, but the texture suffers after that. For extra presentation, add a few crumbled tortilla chips around the edge of each plate to catch any stray sauce.
Pro Tips For Making Applebee'S Quesadilla Salad
- CRISP THE TORTILLAS FAST: Heat a dry skillet over medium-high—no oil needed—until it’s smoking hot. Toss in the tortillas one at a time and flip aggressively every 15 seconds until they’re blistered and crisp in 30 seconds total. I used to cook them too long and end up with sad, rubbery shells—this method guarantees the right texture every time.
- SALT THE CHEESE FIRST: Sprinkle the sharp cheddar with a pinch of salt and let it sit for 5 minutes before layering it between the tortillas. The cheese melts more evenly and develops deeper flavor—no more wondering why your quesadilla tastes flat. (Yes, even if you’re impatient like me.)
- SKIP THE RAW TOMATO TRAP: Dice the tomatoes small but leave them cold until the very end. If you toss them in while the quesadilla’s still hot, they’ll turn to mush and water down the salad. Add them just before serving—crisp, bright, and holding their shape.
- UPGRADE WITH ACID: Squeeze a teaspoon of lime juice over the avocado and tomatoes right before assembling. The acid cuts through the richness of the cheese and makes the flavors pop. I was skeptical until I tried it—now it’s non-negotiable for me.
Health benefits of this recipe
Crispy Protein Boost
The crispy tortilla bites in this salad provide a satisfying protein boost without the heaviness of traditional quesadillas. Each serving contains about 10-12 grams of protein from the 8 flour tortillas and 1.5 cups sharp cheddar, making it a more balanced meal than you'd expect from a salad.
The cheese also adds calcium and vitamin A, while the tortillas contribute fiber for digestion. 💪
Balanced Macros
This dish strikes a perfect balance between carbs, protein, and healthy fats. The avocado and olive oil provide heart-healthy monounsaturated fats, while the cheese and tortillas offer complex carbs. With about 350-400 calories per serving, it's satisfying enough to be a main course but not overly indulgent.
The ranch velout adds creaminess without excessive calories—just 50 calories per tablespoon when made with full-fat sour cream.
Fresh Vegetable Benefits
The romaine lettuce and tomatoes add fiber, vitamin C, and antioxidants to this dish. One head of romaine provides 15% of your daily vitamin K and 10% vitamin A, while the tomatoes contribute lycopene, a powerful antioxidant.
The avocado adds potassium and vitamin E, making this salad a nutrient-packed meal that goes beyond just being tasty. The lime wedges provide a dose of vitamin C to help with absorption of these nutrients.
Customizable Nutrition
Want to lighten this up? Swap the sour cream for Greek yogurt to cut calories by about 50 per serving while keeping the protein high. Use low-fat cheese to reduce saturated fat by 30% without sacrificing flavor much.
For extra fiber, add black beans or corn to the salad base. The beauty of this recipe is how easily it adapts to your dietary needs while keeping that signature Applebee's taste. 🌱
Meal Prep Advantage
This salad keeps well for 2 days in the fridge, making it perfect for meal prep. The crispy tortilla bites can be baked ahead and reheated for 5 minutes at 350°F to restore their crunch. The veggies and dressing can be prepped separately, so you're not assembling soggy ingredients.
This makes it an excellent option for busy weeknights when you want restaurant-quality food without the wait. The components stay fresh longer than most salads because of the cheese's protective qualities.
Satisfying Texture
The contrast between crispy tortillas, creamy ranch, and fresh veggies creates a satisfying texture that makes this salad more filling than traditional lettuce-based salads. This texture combination helps curb cravings and keeps you feeling full longer.
The butter in the veggie mix adds richness that balances the acidity from the tomatoes and lime, making each bite more enjoyable. It's the kind of dish that feels indulgent but still leaves you satisfied. ✨
Nutrition facts
Frequently asked questions
Can I make this salad ahead of time?
Yes, but with a few key adjustments! The crispy tortilla bites should be baked fresh and added just before serving. Store the veggies and ranch velout separately in the fridge for up to 2 days, then assemble everything right before eating. If you must prep ahead, bake the tortilla triangles and store them in an airtight container for 1 day—reheat at 350°F for 5 minutes to restore crispness.
What's the secret to crispy tortilla bites?
The magic is in the baking technique! Brush the tortillas with olive oil before baking and leave a ½-inch border without cheese. Bake at 425°F for 10-12 minutes until deep golden brown. The high heat creates that perfect crunch while the cheese melts just enough to hold the tortillas together. Don't overcrowd the pan or they'll steam instead of crisp up!
Can I substitute the sharp cheddar?
Monterey Jack works in a pinch (use 1 cup instead of 1.5 cups), but it lacks the tangy bite. For extra flavor, try a mix of cheddar and pepper jack. Avoid pre-shredded cheese—it contains anti-caking agents that prevent proper melting. If you must use it, pulse it in a food processor first to break up those agents.
Why does my salad get soggy?
Sogginess usually happens when the tortilla bites absorb too much moisture. Let them cool completely after baking before assembling. Keep the ranch velout separate until the last minute, then gently toss it in just enough to coat. If needed, drain any excess liquid from the veggies before adding the tortilla pieces. The butter in the veggie mix should be used sparingly—just 1 tablespoon total.
How can I make this vegetarian?
Easy! Skip the cheese and add ½ cup black beans or ½ cup corn to the veggie mix for extra protein and texture. Use a vegan ranch dressing and swap the sour cream for coconut yogurt. The crispy tortilla bites become the star—just