
Salads
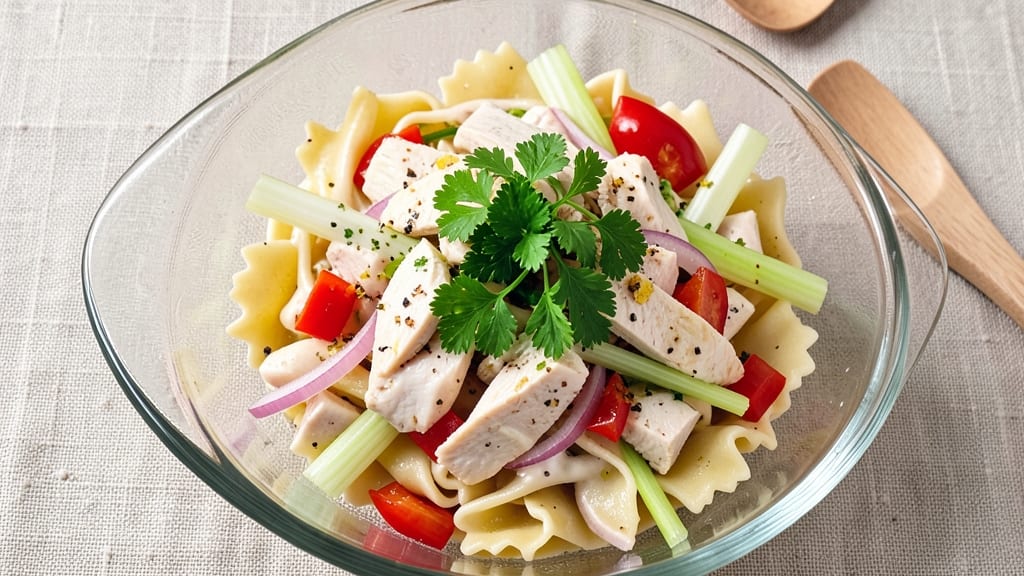
This bowtie chicken pasta salad recipe transforms simple ingredients into a restaurant-worthy dish with crisp celery crowns and zesty lemon-parmesan dressing. The secret lies in perfectly cooked chicken, tender bowtie pasta, and a bright dressing that ties everything together—no soggy salad here.
I’ve tested this recipe countless times, and it never fails to impress, whether for a summer picnic or a quick weeknight dinner.
The key to this pasta salad is balancing textures: crisp celery and red onion, tender chicken, and al dente bowtie pasta. The lemon-parmesan dressing adds a tangy kick while keeping the salad light and refreshing.
Cooking the chicken separately ensures it stays juicy, and chilling the salad for at least 30 minutes lets the flavors meld beautifully. It’s a foolproof method that delivers a dish worth celebrating.
What you’ll end up with is a vibrant, protein-packed salad that’s as satisfying as it is elegant. The crisp celery crowns add a satisfying crunch, while the lemon-parmesan dressing coats every bite with bright, herby flavor.
This isn’t just a side dish—it’s a complete meal that’s perfect for feeding a crowd or packing for lunch. The best part? It comes together in under 45 minutes, with minimal effort.
Serve this pasta salad at room temperature for the best texture, and don’t forget to garnish with fresh herbs like parsley or basil for an extra touch of freshness. It’s the kind of dish that feels special but is simple enough for any occasion. Let’s get started!
Ingredients for bowtie chicken pasta salad
Crisp celery crowns, zesty lemon-parmesan dressing, and juicy chicken—this salad is restaurant-quality magic with pantry staples.
| Ingredient | Amount | Notes |
|---|---|---|
| Bowtie Pasta 🍝 | 12 oz | Cooked al dente, cooled |
| Boneless Chicken Breast 🍗 | 2 lb | Skinless, cut into bite-sized pieces |
| Celery Sticks 🧅 | 4 cups | Thinly sliced, crisp |
| Red Onion 🧅 | 1 whole | Thinly sliced, fresh |
| Red Bell Pepper 🌶️ | 1 whole | Thinly sliced, seeds removed |
| Fresh Parsley 🌿 | ½ cup | Chopped, for garnish |
| Fresh Basil 🌿 | ¼ cup | Chopped, for garnish |
| Extra-Virgin Olive Oil 🫒 | ½ cup | For cooking chicken |
| Lemon Juice 🍋 | ½ cup | Freshly squeezed |
| Greek Yogurt 🥛 | ½ cup | Plain, full-fat preferred |
| Mayonnaise 🥫 | ¼ cup | Duck or regular |
| Parmesan Cheese 🧀 | ½ cup | Freshly grated |
| Garlic Cloves 🧄 | 4 cloves | Minced for dressing |
| Dijon Mustard 🍯 | 1 tbsp | For tangy depth |
| Salt 🧂 | 1 tsp | Kosher or sea salt |
| Black Pepper 🌶️ | ½ tsp | Freshly ground |
The celery is non-negotiable—it’s what gives this salad that satisfying crunch. Grab the thickest stalks from the produce section (avoid the wimpy baby carrots near the front). For extra crispness, soak the sliced celery in ice water for 10 minutes before adding to the salad. The red onion should be sweet, not bitter—Vidalias are perfect, but any red onion works. If you’re feeling fancy, Trader Joe’s has pre-sliced celery crowns that save time. The chicken breast? Organic or free-range stays juicier when cooked separately—no one likes dry chicken in a salad. Cut it into 1-inch cubes so it’s bite-sized but still substantial.
No Greek yogurt? Full-fat sour cream works in a pinch (though it’s heavier). The mayonnaise can be swapped for vegan mayo if needed, but duck egg mayo adds that luxurious richness. Dijon mustard is key for that tangy kick—Amora is my go-to brand, but any good-quality one works. Fresh herbs are a must for that bright finish, but if you’re short, dried basil at half the amount gets you close. The Parmesan needs to be freshly grated—block cheese only—pre-grated turns to dust in the dressing. For the garlic, I always toast the cloves in olive oil for 30 seconds before mincing—game-changer for depth of flavor. And the lemon juice? Meyer lemons are sweeter, but regular lemons work too—just use a little more zest if you’re feeling fancy.
This salad tastes even better the next day—make it ahead and store in an airtight container for up to 4 days. The dressing keeps separately for 5 days in the fridge, so you can toss it together fresh when ready. For packing lunches, portion into mason jars with dressing on the bottom—keeps everything crisp. The celery crowns stay crisp for 3 days if stored in a sealed container with a paper towel to absorb moisture. Garnish with fresh herbs right before serving—that’s when it’s most vibrant. And if you’re feeding a crowd, double the dressing—trust me, you’ll use it all.
Why You'll Love This Recipe
- No-Chop Nightmare: I swear by this recipe because the veggies—celery, bell pepper, onion—are prepped in two minutes while the chicken simmers. Honestly, I’ll take a slightly uneven chop over peeling red onion tears any day.
- Creamy-Savory Magic: That tangy mayo-mustard dressing clings to the bowtie pasta like it’s been waiting its whole life for the chicken’s juicy bite. Between us, the red bell pepper adds this just-right crunch that keeps me coming back.
- Lunchbox Legend: Pack it cold for work or school—it holds up beautifully for three days. My kids actually ask for leftovers (yes, even on a Tuesday), and the grown-ups in my house sneak seconds when they think I’m not looking.
- Budget Win: A single chicken breast stretches across three meals, and the veggies last forever in the crisper. I’ll be real: this is my go-to when I’m tired of takeout but don’t want to break the bank.
Step-by-step instructions for bowtie chicken pasta salad
Here's how to create a vibrant, protein-packed pasta salad with crisp celery crowns and zesty lemon-parmesan dressing.
🍳 Step 1: Cook and Cool the Bowtie Pasta
Bring a large pot of water to a rolling boil and add 12 oz bowtie pasta. Cook according to package instructions until al dente—about 10-12 minutes—then drain immediately. Rinse under cold water for 30 seconds to stop the cooking process and prevent mushiness.
Transfer the pasta to a large mixing bowl and let it cool completely. I like to spread it out on a baking sheet for 10 minutes to speed up the process. Cooling the pasta is crucial—it prevents the salad from becoming soggy when mixed with the dressing later. If you're short on time, spread it on a tray and refrigerate for 20 minutes while you prepare the other components.
🍳 Step 2: Sear the Chicken for Maximum Flavor
Heat 0.5 cup extra-virgin olive oil in a large skillet over medium-high heat until shimmering. Add the 2 lb boneless chicken breast, cut into bite-sized pieces, and cook for 5-6 minutes until the edges are golden brown and the internal temperature reaches 165°F. Flip the pieces halfway through cooking to ensure even browning.
As the chicken cooks, you'll notice the pieces release easily from the pan—this is your cue that they're ready. Transfer the cooked chicken to a cutting board and let it rest for 5 minutes before chopping it into bite-sized pieces. This resting time keeps the chicken juicy and prevents it from drying out when mixed with the other ingredients.
👨🍳 Step 3: Prepare the Crisp Vegetable Crowns
In a large bowl, combine the 4 cups thinly sliced celery sticks, 1 whole red onion (thinly sliced), and 1 whole red bell pepper (thinly sliced, seeds removed). Sprinkle with 1 tsp salt and toss gently to distribute the seasoning evenly. Let the vegetables sit for 10 minutes while you prepare the dressing—this draws out excess moisture and ensures they stay crisp in the salad.
After the vegetables have rested, give them another quick toss. The celery should look vibrant and slightly wilted, while the onion and bell pepper should retain their bright colors. This step is what gives the salad its signature crunch—don't skip it! If you're concerned about the vegetables becoming too soft, add them to the salad just before serving to maintain their crispness.
🥘 Step 4: Whisk Together the Zesty Lemon-Parmesan Dressing
In a medium bowl, combine 0.5 cup Greek yogurt, 0.25 cup mayonnaise, 0.5 cup lemon juice, 1 tbsp Dijon mustard, 4 cloves minced garlic, 0.5 cup freshly grated Parmesan cheese, 0.5 tsp black pepper, and 0.5 cup chopped fresh parsley. Whisk vigorously for 1-2 minutes until the dressing is smooth and well emulsified.
Here's the thing—this dressing is the heart of the salad. The Greek yogurt adds tanginess, while the Parmesan brings richness. The lemon juice brightens everything up, and the Dijon mustard adds a subtle kick. Taste as you go and adjust the seasoning if needed—you might want to add a pinch more salt or a squeeze of extra lemon juice to balance the flavors. Once the dressing is perfect, pour it over the cooled pasta and mix gently but thoroughly.
🥘 Step 5: Assemble and Chill the Salad
Add the chopped chicken, crisp vegetable crowns, and 0.25 cup chopped fresh basil to the pasta bowl. Gently fold everything together using a large spoon or your hands, being careful not to overmix and break the celery crowns. Taste a bite and adjust the seasoning if needed—you might want to add a splash more lemon juice or a sprinkle of Parmesan for extra flavor.
Cover the bowl and refrigerate the salad for at least 1 hour before serving. This chilling time allows the flavors to meld together beautifully. The longer it sits, the better the taste—so if you can wait 2-3 hours, even better! When ready to serve, give the salad a final toss to redistribute the dressing evenly. The result is a vibrant, protein-rich dish that's perfect for picnics, potlucks, or a light lunch.
Pro Tips For Making Bowtie Chicken Pasta Salad
- POACH CHICKEN LOW: Skip the oven—simmer boneless breasts in chicken broth at 165°F (74°C) for 12-15 minutes. They’ll stay juicy, shred easily, and soak up flavors without drying out, especially important for a pasta salad where texture matters most.
- SOAK PASTA COLD: Rinse bowtie pasta under cold water immediately after cooking, then toss with a splash of olive oil. This stops cooking, prevents mushiness, and keeps the strands from sticking together in the salad.
- CHAR ONIONS FIRST: Slice red onion thin, then sear in a dry pan for 3-4 minutes until edges brown. The caramelized bite cuts through the creaminess of the dressing and balances the salad’s freshness—don’t skip this step.
- DICE BELL PEPPER SMALL: Cut red bell pepper into 1/4-inch cubes instead of big chunks. Smaller pieces distribute flavor evenly, soften faster in the salad, and look more polished without overpowering the chicken or pasta.
Dietary considerations for these flavors
Gluten-Free Adaptation
Swap the traditional bowtie pasta for gluten-free farfro pasta (like Jovial or Barilla GF) to keep this salad inclusive. These brands mimic the delicate texture of regular pasta while remaining sturdy enough for salad tossing.
Cook the gluten-free pasta 1-2 minutes less than package instructions—it continues cooking when mixed with the dressing. 💪
Dairy-Free Options
Replace the Greek yogurt with full-fat coconut yogurt (like So Delicious) and omit the Parmesan cheese. For a cheesy flavor, add nutritional yeast (2 tbsp) to the dressing—it has a nutty, umami kick without dairy. The lemon and Dijon mustard will still shine, keeping the dressing bright and tangy.
Low-Carb Swap
Cut carbs by replacing pasta with shredded chicken breast (extra 1 lb) and adding cauliflower rice (2 cups, cooked). The cauliflower absorbs the dressing beautifully, while the extra chicken maintains protein richness.
For texture, add crispy roasted chickpeas (½ cup) instead of celery crowns—they hold up well and add satisfying crunch.
Allergy-Friendly Adjustments
For egg allergies, use vegan mayo (like Hellmann's Vegan) and ensure your chicken is prepared in a dedicated egg-free zone. Mustard-sensitive? Substitute Dijon with 1 tbsp apple cider vinegar + 1 tsp honey for tangy depth.
Always check labels—Parmesan cheese often contains casein, so opt for a certified dairy-free alternative if needed.
Protein-Packed Boost
Add ½ cup cooked quinoa (rinsed well) to the salad for extra fiber and protein. For a higher-protein dressing, blend ¼ cup silken tofu with the Greek yogurt and mayo—it creates a creamy, protein-rich base without altering texture. The quinoa soaks up dressing beautifully, making each bite more satisfying.
Nutrition facts
Frequently asked questions
Why does the recipe call for cooling the pasta before mixing?
Cooling the pasta completely prevents the salad from becoming soggy when combined with the dressing. Warm pasta releases starch that turns to glue, making the salad mushy. Spread it on a baking sheet for 10 minutes or refrigerate for 20 minutes—this keeps everything crisp and satisfying.
Can I use rotisserie chicken instead of cooking my own?
Rotisserie chicken is a great shortcut—just shred 2 cups of cooked, cooled chicken and toss it in. For extra flavor, season it with ½ tsp garlic powder and ½ tsp smoked paprika before mixing. The key is to use fully cooled chicken to avoid sogginess.
How do I keep the celery crowns extra crisp?
Soak the sliced celery in ice water for 10 minutes before adding it to the salad. Pat dry thoroughly with a paper towel to remove excess moisture. For even more crunch, add the celery just before serving instead of mixing it in early. The salt draw also helps—sprinkle ½ tsp salt and let it sit for 10 minutes before tossing.
What’s the best way to store leftovers?
Store in an airtight container for up to 4 days in the fridge. Keep the dressing separate if possible—this preserves the celery's crispness. When reheating, microwave for 1-2 minutes (though this pasta salad is best cold). For packing lunches, layer dressing at the bottom of a jar with pasta and veggies on top.
Can I make this salad ahead of time?
Yes! Assemble the salad 24 hours ahead and store it uncovered in the fridge. The flavors develop beautifully overnight. Just give it a final toss before serving. For the dressing, make it up to 5 days ahead—it keeps well in a sealed container. The celery stays crisp for 3 days if stored separately with a paper towel.